Send emails in HTML format
In this tutorial, we will create a flow to send welcome emails to users who have subscribed to a list.
In this tutorial we'll:
- Create a base template to be used in all emails.
- Create a welcome template to be sent to new users.
- Create a flow that sends a welcome email.
Sources
Sources for this tutorial can be found in the examples/email folder of this repository.
Getting Started
Python setup
Requires an installation of Python 3.7+.
We recommend using a Python virtual environment manager such as pipenv, conda or virtualenv.
This flow is designed to work with Prefect 2.0. For more information about how to use Prefect, please refer to the Prefect documentation.
prefect-email
This tutorial requires the prefect-email collection installed to send emails.
Installation
Install prefect-jinja and prefect-email with pip:
pip install prefect-jinja prefect-email
Then, register to view blocks on Prefect Cloud:
prefect block register -m prefect_jinja.blocks

prefect block register -m prefect_email.credentials
Project Structure
Let's consider the following project structure:
├── flows
│   ├── templates
│   │    ├── base.html
│   │    └── welcome.html
│   └── send_welcome.py
└── requirements.txt
Run the command below to create the required directories:
mkdir -p flows/templates
Blocks
Open the Prefect UI and navigate to the Blocks page.
To create a new block, select the + button on this page, or if you haven't previously created any blocks, New Block. Prefect displays a page of available block types.
For this tutorial, we will use the Jinja Environment and Email Server Credentials blocks.
Jinja Environment
Scroll down the list of blocks and find the Jinja Environment block, then select Add + to configure a new block.
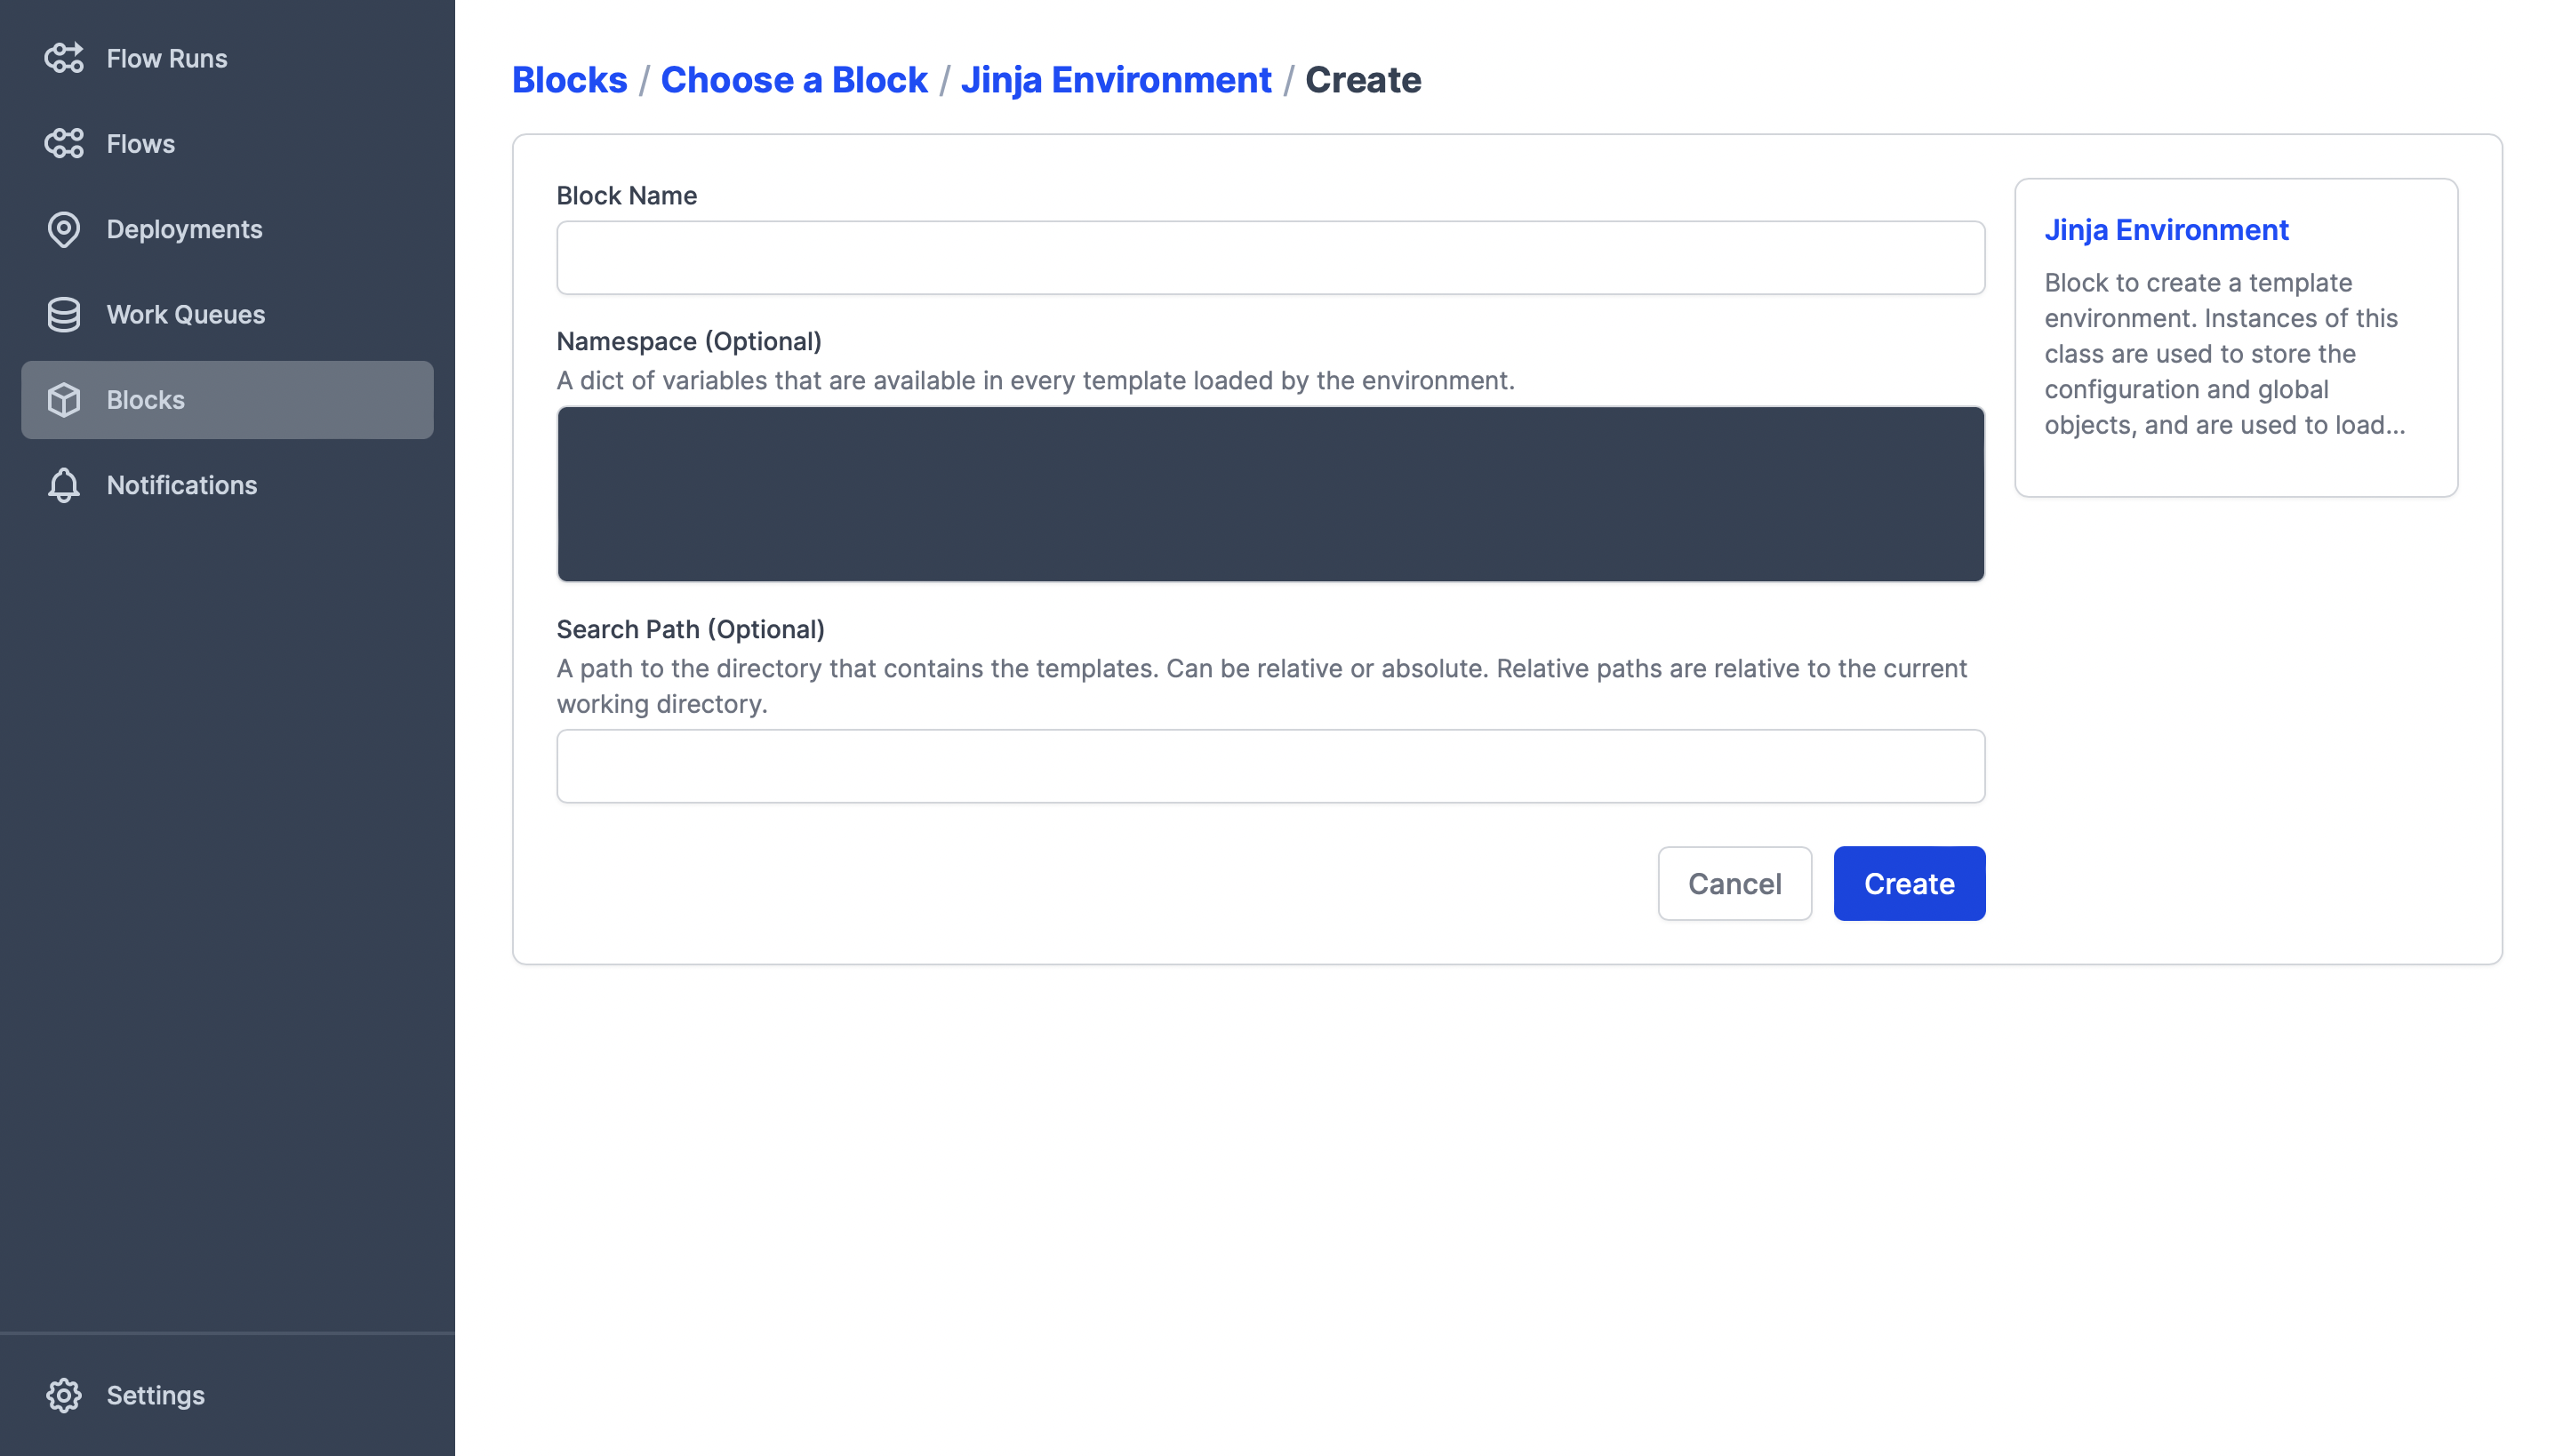
Enter the configuration for your Jinja Environment:
- Block Name is the name by which your block is referenced. The name must only contain lowercase letters, numbers, and dashes.
- Namespace contains the variables that are available in every template loaded by the block.
- Search Path is the name of the directory where the templates are stored. Can be relative or absolute. Relative
paths are relative to the running
flowdirectory.
In this tutorial, we will use the following settings:
- Block Name:
email-templates - Namespace:
{ "logo": "https://d33wubrfki0l68.cloudfront.net/504beb80ec8dfc980a28612dd72249b413897927/8118e/assets/prefect-logo-gradient-navy.svg", "slack": "https://prefect.io/slack", "discourse": "https://discourse.prefect.io" } - Search Path:
templates
Select Create to create the block. Prefect displays the details of the new block, including a code example to use in your flow code.
Email Server Credentials
Navigate back to the Blocks page and select the + button on this page to create a new block. Scroll down the list of blocks and find the Email Server Credentials block, then select Add + to configure a new block.
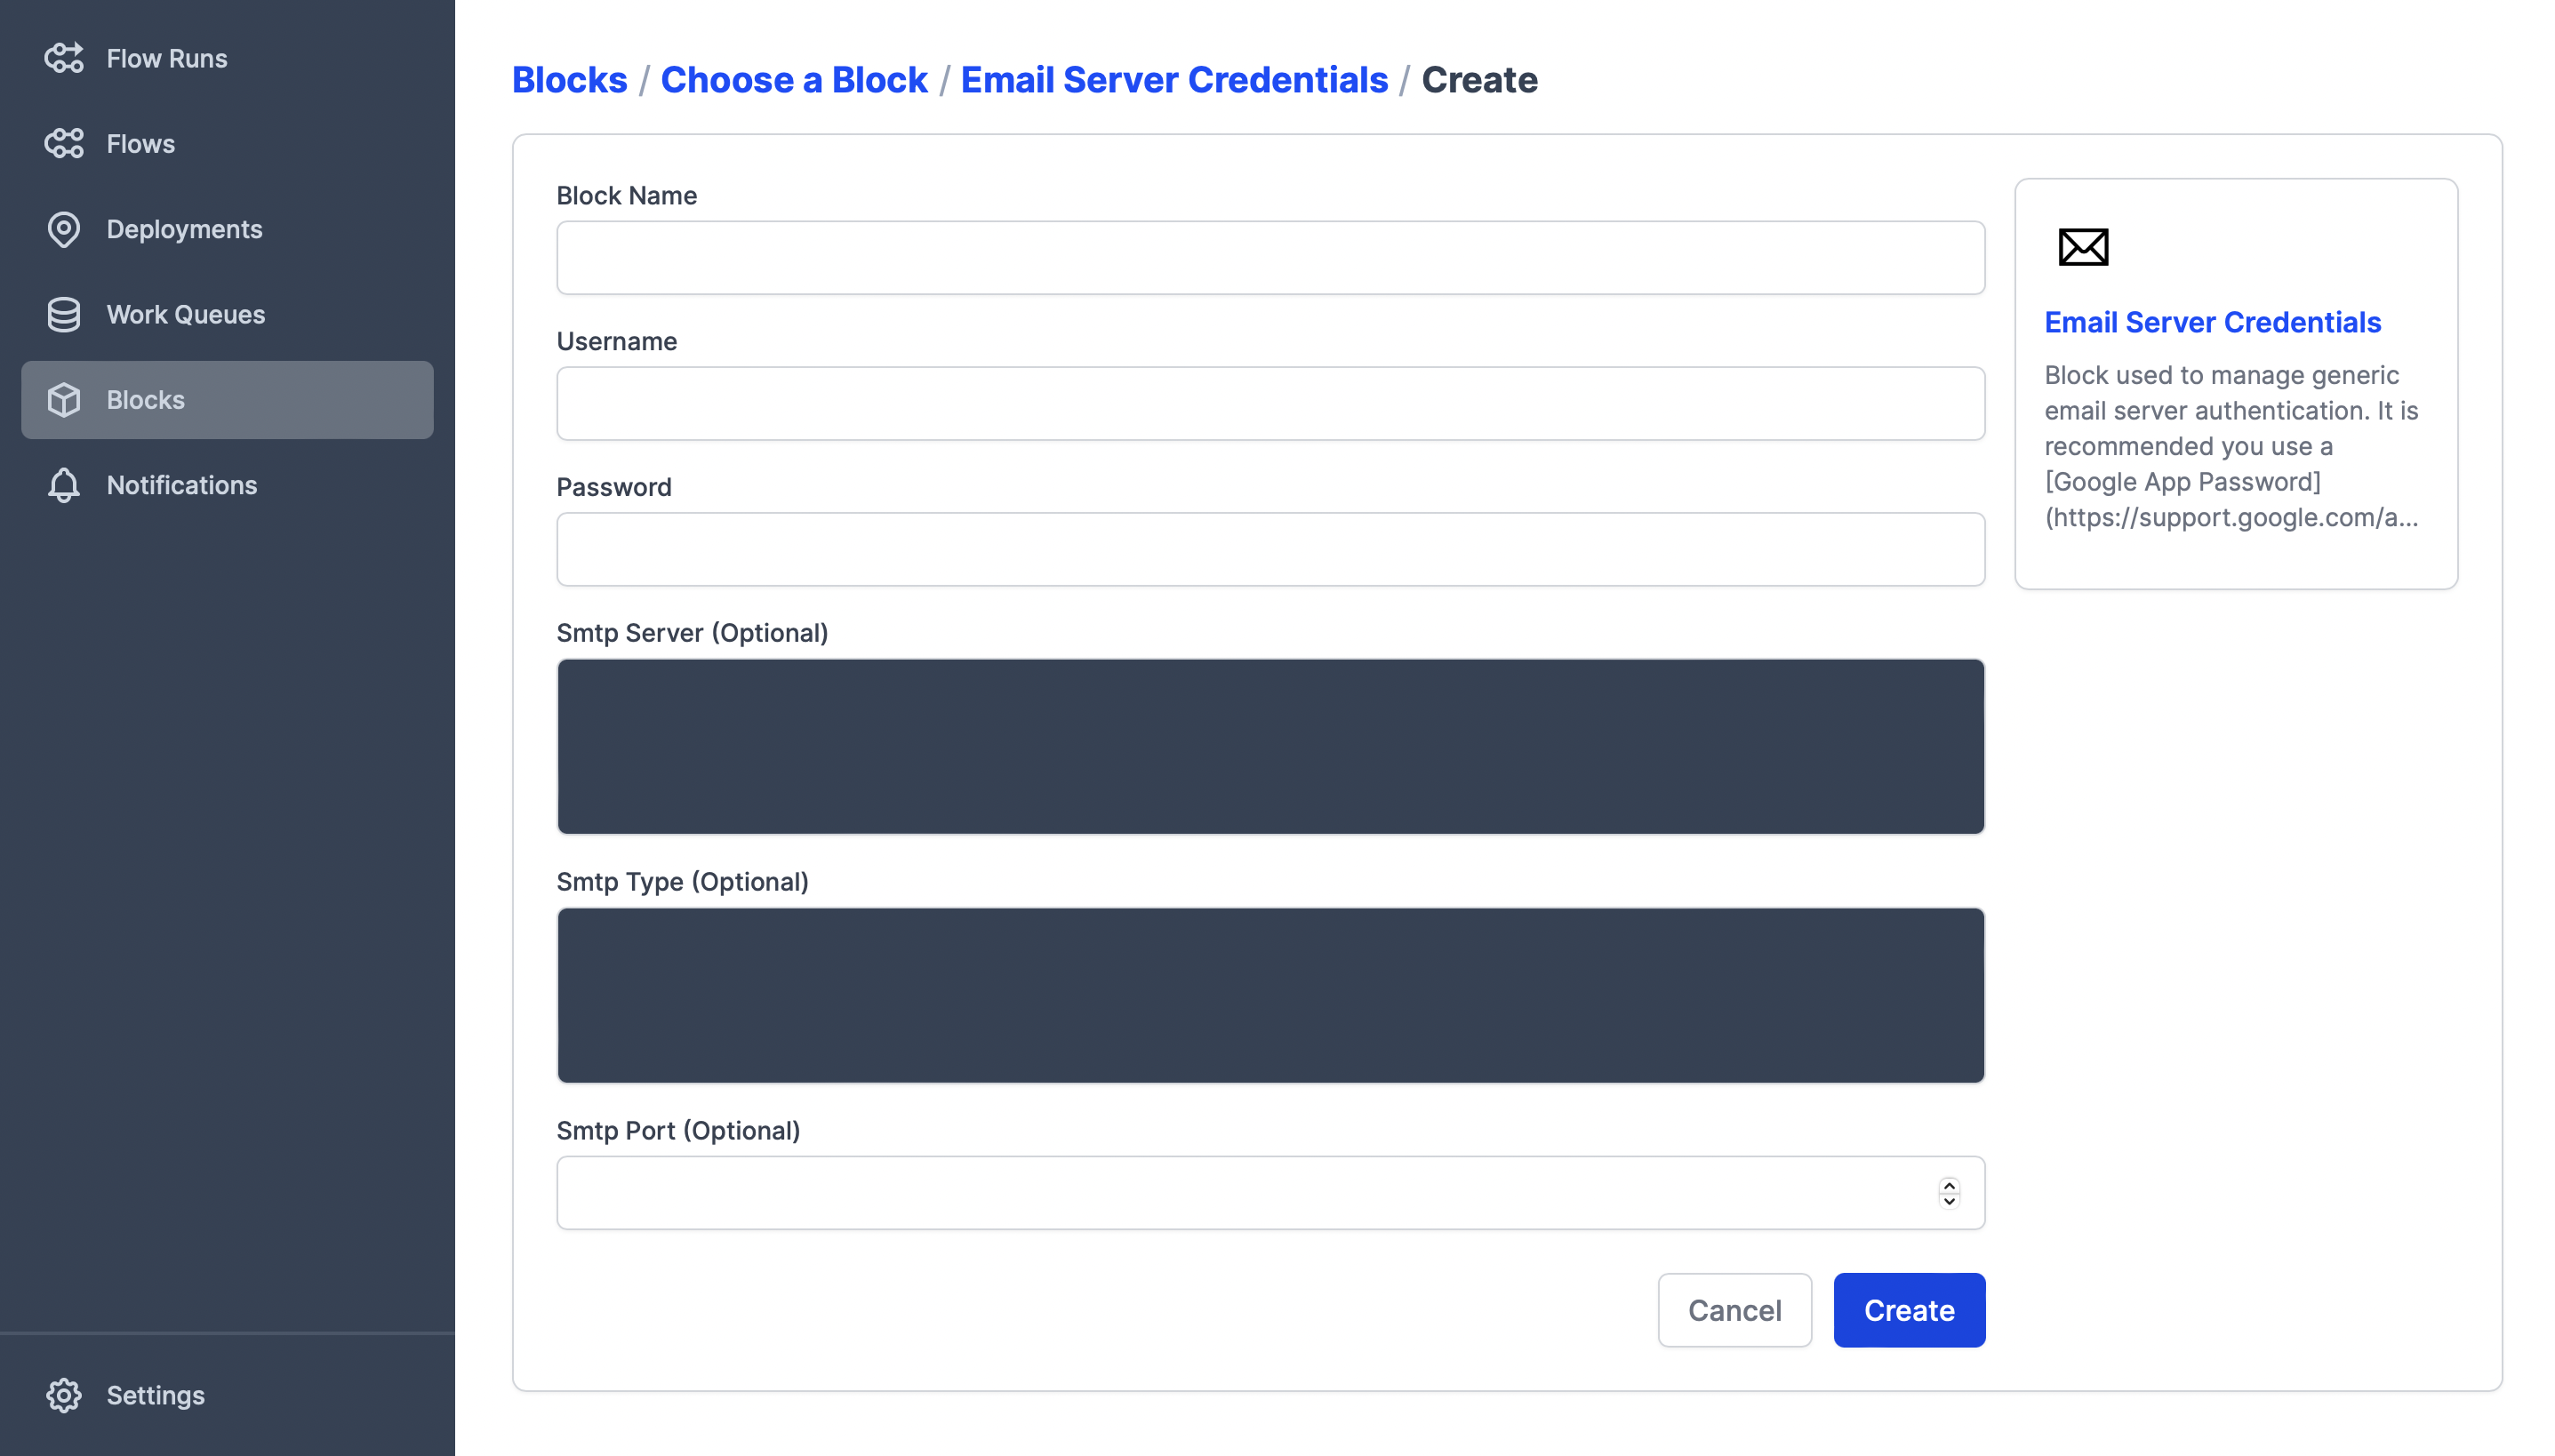
Enter the configuration for your email server:
- Block Name is the name by which your block is referenced. The name must only contain lowercase letters, numbers, and dashes.
- Username: The username to use for authentication to the server.
- Password: The password to use for authentication to the server.
- SMTP Server: Either the hostname of the SMTP server, or one of the keys from the built-in SMTPServer Enum members, like "gmail".
- SMTP Type: Either "SSL", "STARTTLS", or "INSECURE".
- SMPT Port: If provided, overrides the smtp_type's default port number.
In this tutorial, we will use the following settings:
- Block Name:
outgoing-mail-server
Username, Password and SMTP Server
The values of these fields were not displayed for security reasons. Check with your email provider for the correct values for these fields.
Select Create to create the block. Prefect displays the details of the new block, including a code example to use in your flow code.
Templates
As this repository may contain other email flows, let's create a base template to standardize the layout of all emails. Next, let's create the welcome template.
Base
Create a file named base.html inside the flows/templates directory with the following content:
<!DOCTYPE html>
<html>
<head><title>{% block title %}{% endblock %}</title>
<body>
<table width="100%">
    <tr>
        <td align="center">
            <img alt="Logo" src="{{ logo }}" width="200px" height="50px">
        </td>
    </tr>
    <tr>
        <td>
            {% block content %}{% endblock %}
        </td>
    </tr>
</table>
</body>
</html>
Welcome
Create a file named welcome.html inside the flows/templates directory with the following content:
{% extends "base.html" %}

{% block title %}Welcome to Prefect{% endblock %}

{% block content %}
<p>Hi {{ username }}!</p>
<p>
    Having any trouble upgrading to Prefect 2.0 at all? Try out our
    <a href="https://www.youtube.com/watch?v=YyAQ61eRGhI&list=PLZfWmQS5hVzF3u9FY4-43U4UoTblFgC2l">
        full YouTube playlist
    </a> of migration content!
</p>
<p>
    If you need any help, please don't hesitate to reach out in our
    <a href="{{ slack }}">Slack community</a>
    or
    <a href="{{ discourse }}">Discourse forum</a>!
</p>
<p>Happy Engineering,</p>
<p>Prefect Customer Success Team</p>
{% endblock %}
Flow
Create the send_welcome.py inside the flows directory with the following content:
from prefect import flow
from prefect_email import EmailServerCredentials, email_send_message
from prefect_jinja import JinjaEnvironmentBlock, jinja_render_from_template

@flow
def send_welcome_flow(username: str, email_to: str):
    jinja_environment = JinjaEnvironmentBlock.load("email-templates")
    email_body = jinja_render_from_template(
        "welcome.html",
        jinja_environment,
        username=username
    )

    email_server_credentials = EmailServerCredentials.load("outgoing-mail-server")
    email_send_message(
        email_server_credentials=email_server_credentials,
        subject="Welcome to Prefect",
        msg=email_body,
        email_to=email_to,
    )

if __name__ == '__main__':
    result = send_welcome_flow(username="Jeronimo", email_to="jeronimo@example.com")
    print(result)
Running
Enter the flows directory. Then run the send_welcome.py flows with python:
cd flows

python send_welcome.py
The template will be rendered and send by the prefect-email with the following content:
<!DOCTYPE html>
<html>
<head><title>Welcome to Prefect</title>
<body>
<table width="100%">
    <tr>
        <td align="center">
            <img alt="Logo" src="https://d33wubrfki0l68.cloudfront.net/504beb80ec8dfc980a28612dd72249b413897927/8118e/assets/prefect-logo-gradient-navy.svg" width="200px" height="50px">
        </td>
    </tr>
    <tr>
        <td>
            <p>Hi Jeronimo!</p>
            <p>
                Having any trouble upgrading to Prefect 2.0 at all? Try out our
                <a href="https://www.youtube.com/watch?v=YyAQ61eRGhI&list=PLZfWmQS5hVzF3u9FY4-43U4UoTblFgC2l">
                    full YouTube playlist
                </a> of migration content!
            </p>
            <p>
                If you need any help, please don't hesitate to reach out in our
                <a href="https://prefect.io/slack">Slack community</a>
                or
                <a href="https://discourse.prefect.io">Discourse forum</a>!
            </p>
            <p>Happy Engineering,</p>
            <p>Prefect Customer Success Team</p>
        </td>
    </tr>
</table>
</body>
</html>
That's it 🥳. Now emails sent through Prefect flows will look more elegant.
I hope this helps you.